If I were doing project 365 this year:



 |
| freshly made apple cider donuts |
 |
| a bowl full of fresh picked deliciousness |
 | |||
| nature trail walk |
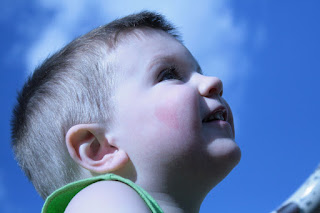 I had shot some pictures earlier this morning and changed my white balance to tungsten and had forgotten to change it back. Ugh, nearly every photo I shot at the sunny playground made my children look like Violet Beauregarde after she chomped on Wonka's chewing gum. But when I did an adjustment for skin tone, it altered the beautiful vibrant blue of the sky. Enter a handy tool I just learned last week in a new CK special issue. Using the Magic Extractor tool under Image, I was able to get Maddox on a separate layer from the sky (be sure to create a dupe layer first). Once he was his own layer, I could adjust his skin tone to its normal color (too bad I couldn't help poor Violet this easily) and keep the sky the vibrant blue that it was. I also used the Clone Stamp tool in the side bar to get rid of the unsightly monkey bar in the lower right corner. This is one of my favorite tools, that and the Spot Healing Brush, which I seem to need on pics of me a LOT lately! Here's the final, and much improved picture:


 Posts
All Comments
Posts
All Comments


